COMPASS

Public resource

Hyperlordosis

Hyperlordosis (an increased lumbar curve) means there is more inward curve in the low back than is typically seen. It is common and not always a problem, but it can sometimes contribute to low back pain, hip discomfort or muscle fatigue.
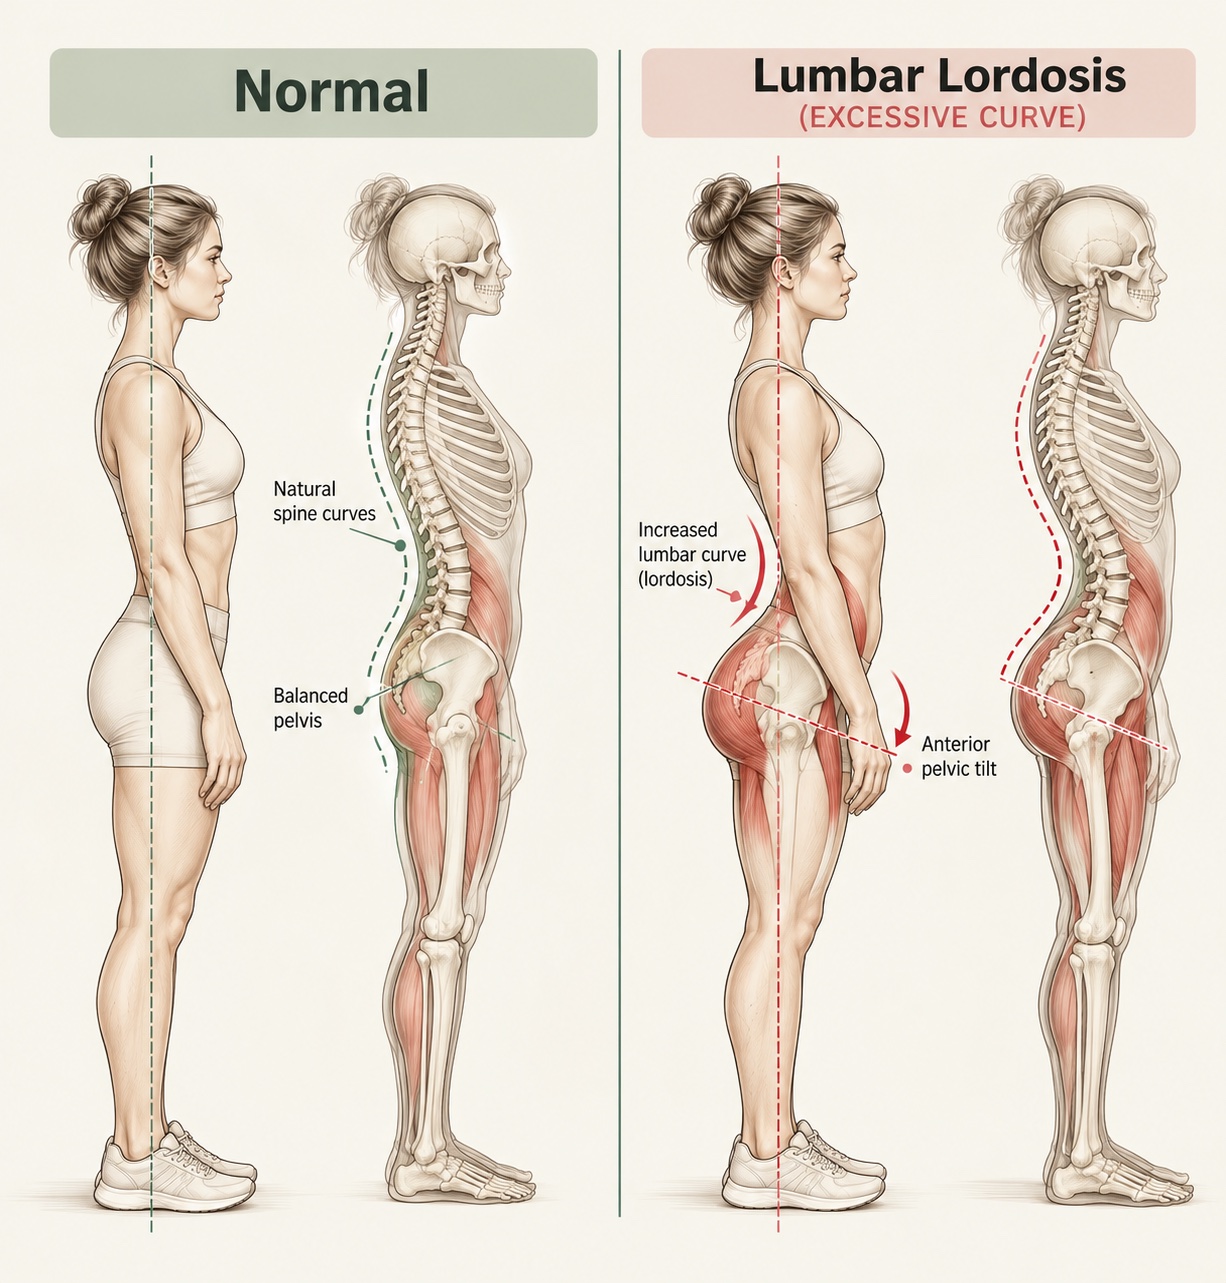
Side-on drawings comparing a normal lumbar curve with an excessive lumbar curve (lordosis), showing the tilted pelvis and the muscles around the hips and low back

Our goal

  • Improve core control and lumbopelvic stability
  • Strengthen the glutes and hips
  • Improve posture and movement awareness
  • Support long-term function and comfort

Key principles

  • Build control. Learn to control your pelvis and spine.
  • Strengthen smarter. Focus on deep core and glute strength.
  • Move often. Regular movement helps your body adapt.
  • Be consistent. Small, consistent effort creates lasting change.

Six exercises to support your low back

Perform 3–5 times a week unless advised otherwise. Move with control and stop if pain increases.

Reps are repetitions, sets are rounds, and hold is how long to pause at the top of the movement.

1. Dead bug
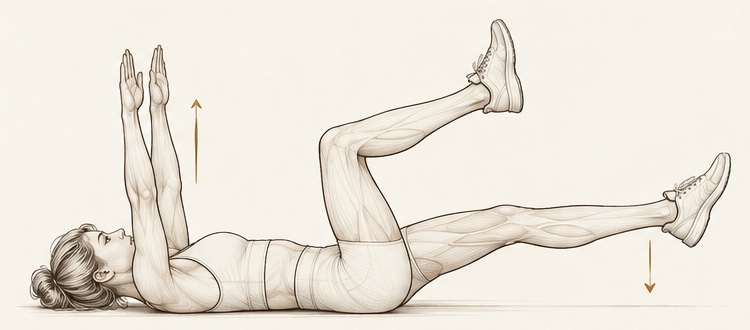
Dead bug illustration

Engage your core and gently lower the opposite arm and leg while keeping your low back neutral.

Reps 8–10 each side

Sets 2–3

Easier Keep your knees in and only move your arms.

Harder Lower your legs further, or use a resistance band.

2. Glute bridge
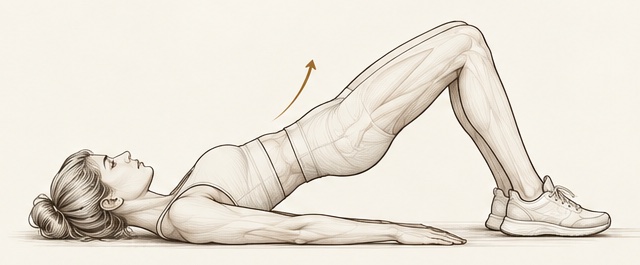
Glute bridge illustration

Squeeze your glutes and lift your hips while keeping your ribs down and your pelvis neutral.

Reps 10–15

Sets 2–3

Hold 2–3 seconds

Easier Use a smaller range of motion.

Harder Single-leg bridge, or add a resistance band.

3. Bird dog
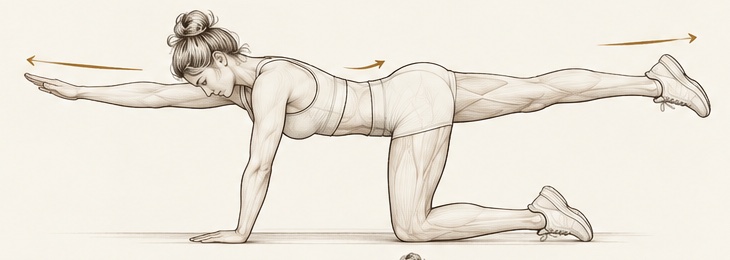
Bird dog illustration

From hands and knees, extend the opposite arm and leg. Keep your hips level and your core engaged.

Reps 8–10 each side

Sets 2–3

Hold 2–3 seconds

Easier Extend only an arm or only a leg.

Harder Add hold time, or light ankle or wrist weights.

4. Pelvic tilt
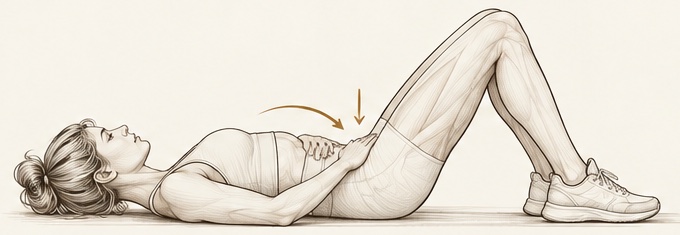
Pelvic tilt illustration

Gently tilt your pelvis to flatten your low back into the floor, then return to neutral.

Reps 10–15

Sets 2–3

Hold 3–5 seconds

Easier Use a smaller movement.

Harder Perform with your legs extended.

5. Hip hinge practice
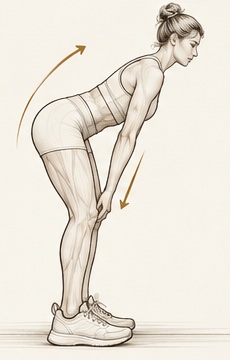
Hip hinge practice illustration

Push your hips back, keeping your spine neutral and your core engaged. Feel the movement in your hips, not your low back.

Reps 8–12

Sets 2–3

Easier Use a dowel for feedback.

Harder Add a light load, for example a kettlebell.

6. Side plank (on knees)
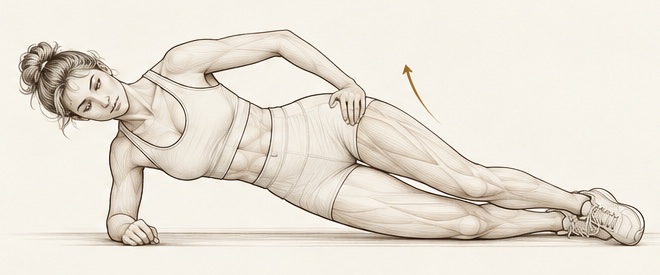
Side plank (on knees) illustration

Lift your hips, creating a straight line from shoulders to knees. Keep your core and glutes active.

Hold 15–30 seconds each side

Sets 2–3

Easier Shorter hold, or support your top knee.

Harder Full side plank (on feet).

Daily habits that help

  • Avoid standing with excessive low back arching.
  • Take movement breaks every 45–60 minutes.
  • Strengthen regularly: small amounts, consistently.
  • Sleep on your side with a pillow between your knees, or on your back with a small pillow under your knees.
  • Use a supportive chair and maintain a neutral posture.

Red flags: stop and get checked

Seek professional care if you experience:

  • Pain that is severe, worsening or not improving
  • Pain down the leg, numbness or tingling
  • Weakness in the legs
  • Loss of bladder or bowel control
  • Pain after a fall or injury
  • Unexplained weight loss or fever

This programme supports your care and results. It does not replace personalised assessment or treatment. Please follow the plan discussed with your chiropractor.

General educational information from the practice — not personalised advice or a prescription. If anything is painful, stop. Book an appointment for guidance specific to you.

Ask Compass

Public resource

Hyperlordosis

Hyperlordosis (an increased lumbar curve) means there is more inward curve in the low back than is typically seen. It is common and not always a problem, but it can sometimes contribute to low back pain, hip discomfort or muscle fatigue.

Side-on drawings comparing a normal lumbar curve with an excessive lumbar curve (lordosis), showing the tilted pelvis and the muscles around the hips and low back

Our goal

  • Improve core control and lumbopelvic stability
  • Strengthen the glutes and hips
  • Improve posture and movement awareness
  • Support long-term function and comfort

Key principles

  • Build control. Learn to control your pelvis and spine.
  • Strengthen smarter. Focus on deep core and glute strength.
  • Move often. Regular movement helps your body adapt.
  • Be consistent. Small, consistent effort creates lasting change.

Six exercises to support your low back

Perform 3–5 times a week unless advised otherwise. Move with control and stop if pain increases.

Reps are repetitions, sets are rounds, and hold is how long to pause at the top of the movement.

1. Dead bug

Dead bug illustration

Engage your core and gently lower the opposite arm and leg while keeping your low back neutral.

Reps 8–10 each side

Sets 2–3

Easier Keep your knees in and only move your arms.

Harder Lower your legs further, or use a resistance band.

2. Glute bridge

Glute bridge illustration

Squeeze your glutes and lift your hips while keeping your ribs down and your pelvis neutral.

Reps 10–15

Sets 2–3

Hold 2–3 seconds

Easier Use a smaller range of motion.

Harder Single-leg bridge, or add a resistance band.

3. Bird dog

Bird dog illustration

From hands and knees, extend the opposite arm and leg. Keep your hips level and your core engaged.

Reps 8–10 each side

Sets 2–3

Hold 2–3 seconds

Easier Extend only an arm or only a leg.

Harder Add hold time, or light ankle or wrist weights.

4. Pelvic tilt

Pelvic tilt illustration

Gently tilt your pelvis to flatten your low back into the floor, then return to neutral.

Reps 10–15

Sets 2–3

Hold 3–5 seconds

Easier Use a smaller movement.

Harder Perform with your legs extended.

5. Hip hinge practice

Hip hinge practice illustration

Push your hips back, keeping your spine neutral and your core engaged. Feel the movement in your hips, not your low back.

Reps 8–12

Sets 2–3

Easier Use a dowel for feedback.

Harder Add a light load, for example a kettlebell.

6. Side plank (on knees)

Side plank (on knees) illustration

Lift your hips, creating a straight line from shoulders to knees. Keep your core and glutes active.

Hold 15–30 seconds each side

Sets 2–3

Easier Shorter hold, or support your top knee.

Harder Full side plank (on feet).

Daily habits that help

  • Avoid standing with excessive low back arching.
  • Take movement breaks every 45–60 minutes.
  • Strengthen regularly: small amounts, consistently.
  • Sleep on your side with a pillow between your knees, or on your back with a small pillow under your knees.
  • Use a supportive chair and maintain a neutral posture.

Red flags: stop and get checked

Seek professional care if you experience:

  • Pain that is severe, worsening or not improving
  • Pain down the leg, numbness or tingling
  • Weakness in the legs
  • Loss of bladder or bowel control
  • Pain after a fall or injury
  • Unexplained weight loss or fever

This programme supports your care and results. It does not replace personalised assessment or treatment. Please follow the plan discussed with your chiropractor.

General educational information from the practice — not personalised advice or a prescription. If anything is painful, stop. Book an appointment for guidance specific to you.