COMPASS

Public resource

First Response to Injury: The POLICE Method

POLICE (Protection, Optimal Loading, Ice, Compression, Elevation) updates the older PRICE routine. The big change is simple: instead of resting, you load the injured area early, gently and in a controlled way, because the research suggests healing tissue responds better to the right amount of movement than to prolonged rest.

What is POLICE?

  • Protection. Protect the injury from further harm for the first few days with support, tape, a brace, a sling or crutches, and avoid the movement that hurts.
  • Optimal Loading. Replace rest with early, gentle, guided movement and weight-bearing within what pain allows. "Optimal" means the right amount, not the most you can do.
  • Ice. A wrapped cold pack for 10 to 20 minutes for comfort in the first day or two.
  • Compression. A firm, not tight, elastic bandage or tape to support the area and limit swelling.
  • Elevation. Raise the injured area above heart level when you are resting.
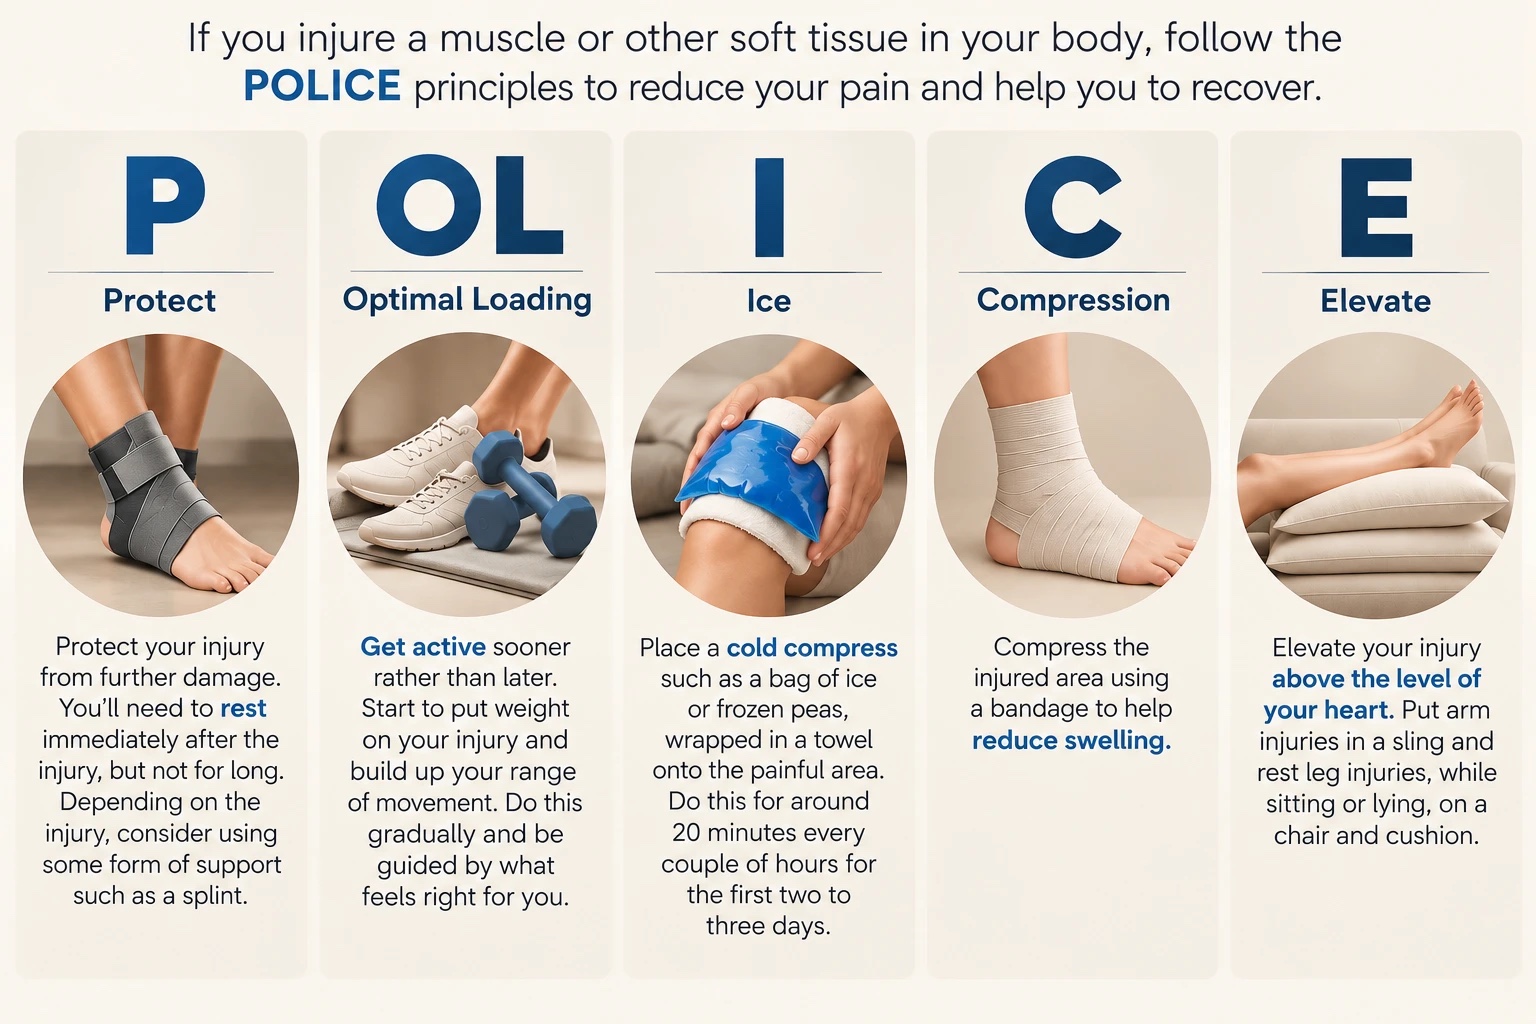
The POLICE principles: protect, optimal loading, ice, compression and elevate

How it differs from PRICE

  • PRICE says rest. POLICE says protect first, then load as early as comfort allows.
  • Both use ice, compression and elevation, mainly for comfort and support.
  • POLICE shifts the focus from what to avoid to what to start doing.

What the research says

  • Early loading. Controlled movement and weight-bearing in the first days appear to help tissue repair, restore function and speed return to normal activity, compared with strict rest.
  • Ice, compression and elevation. They remain low-risk comfort measures, but high-quality evidence that they speed healing is limited.
  • Not a prescription. The right amount of loading depends on the tissue and how severe the injury is, which is why guidance from a clinician helps.
  • Later updates. PEACE & LOVE (2020) builds on POLICE, adds education and avoiding anti-inflammatory medicines in the early phase, and highlights optimism and pain-free aerobic exercise.

Getting the loading right

  • Use pain as your guide: mild discomfort (about 3 out of 10 or less) that settles within a day is generally acceptable
  • If pain climbs, the area swells more, or you start to limp, ease back to the previous step
  • Progress in small steps: protected movement, then weight-bearing, then resistance, then sport
  • Stay consistent. Short, frequent sessions usually work better than one long one

For the active person and athlete

  • Pull out of play, but keep training the rest of your body
  • Keep your fitness up with pain-free cycling, swimming or upper-body work
  • Load early and often, but build in recovery and sleep
  • Return to sport by criteria, not by date. See the return-to-play guide for the stages.

Optimal loading: early exercises

A simple progression. Move to the next step only when the previous one is comfortable. Stop if pain sharpens.

1. Protect and unload

For the first day or two, use support such as a brace, tape, sling or crutches so the injury is not stressed, while you keep the rest of the body moving.

Check You can move the joint gently without sharp pain

2. Light muscle holds (isometrics)

Tighten the muscles around the injury without moving the joint, using about a third to half of your effort.

Hold 10–30 seconds

Reps 5

Frequency Several times a day

3. Gentle range of movement

Move the joint slowly through its comfortable range, for example drawing the alphabet with your foot for an ankle.

Reps 10–15

Frequency Every hour or two while awake

4. Weight-bearing as tolerated

Start putting weight through the limb. Begin with short, level walks, then increase distance and speed as comfort allows.

Time 5–10 minutes

Progression Add time, then gentle slopes and stairs.

5. Progressive resistance

Add controlled strength work for the injured area with body weight, a band or light weights, building load slowly.

Reps 8–12

Sets 2–3

Progression Increase resistance when the last rep stays controlled.

6. Balance and control

Stand on the injured limb with a soft knee, then add small challenges such as closing your eyes or standing on a cushion.

Time 30 seconds

Sets 3

Progression Add head turns, a ball catch or small hops once cleared.

Red flags: get checked promptly

  • You cannot put weight on the limb or take four steps
  • Pain pressed directly over a bone, or a visibly crooked or deformed joint
  • Numbness, pins and needles, a cold or pale limb, or a rapidly growing swelling
  • Warmth, spreading redness or a fever
  • Any head, neck or back injury, dizziness, confusion or loss of consciousness
  • Calf pain and swelling without an injury, or chest pain or shortness of breath. Seek emergency care.
  • No clear improvement after three to five days, or the same injury keeps returning

References

This guide draws on the published sources below. They are listed for further reading and do not replace an assessment.

  1. Bleakley CM, Glasgow P, MacAuley DC. PRICE needs updating, should we call the POLICE? Br J Sports Med. 2012;46(4):220–221. Source
  2. Dubois B, Esculier JF. Soft-tissue injuries simply need PEACE and LOVE. Br J Sports Med. 2020;54(2):72–73. Source
  3. Bleakley CM, O’Connor SR, Tully MA, et al. Effect of accelerated rehabilitation on function after ankle sprain: randomised controlled trial. BMJ. 2010;340:c1964. Source
  4. Collins NC. Is ice right? Does cryotherapy improve outcome for acute soft tissue injury? Emerg Med J. 2008;25(2):65–68. Source
  5. Kwiecien SY, McHugh MP. The cold truth: the role of cryotherapy in the treatment of injury and recovery from exercise. Eur J Appl Physiol. 2021;121(8):2125–2142. Source

Related

General educational information from the practice — not personalised advice or a prescription. If anything is painful, stop. Book an appointment for guidance specific to you.

Ask Compass

Public resource

First Response to Injury: The POLICE Method

POLICE (Protection, Optimal Loading, Ice, Compression, Elevation) updates the older PRICE routine. The big change is simple: instead of resting, you load the injured area early, gently and in a controlled way, because the research suggests healing tissue responds better to the right amount of movement than to prolonged rest.

What is POLICE?

  • Protection. Protect the injury from further harm for the first few days with support, tape, a brace, a sling or crutches, and avoid the movement that hurts.
  • Optimal Loading. Replace rest with early, gentle, guided movement and weight-bearing within what pain allows. "Optimal" means the right amount, not the most you can do.
  • Ice. A wrapped cold pack for 10 to 20 minutes for comfort in the first day or two.
  • Compression. A firm, not tight, elastic bandage or tape to support the area and limit swelling.
  • Elevation. Raise the injured area above heart level when you are resting.
The POLICE principles: protect, optimal loading, ice, compression and elevate

How it differs from PRICE

  • PRICE says rest. POLICE says protect first, then load as early as comfort allows.
  • Both use ice, compression and elevation, mainly for comfort and support.
  • POLICE shifts the focus from what to avoid to what to start doing.

What the research says

  • Early loading. Controlled movement and weight-bearing in the first days appear to help tissue repair, restore function and speed return to normal activity, compared with strict rest.
  • Ice, compression and elevation. They remain low-risk comfort measures, but high-quality evidence that they speed healing is limited.
  • Not a prescription. The right amount of loading depends on the tissue and how severe the injury is, which is why guidance from a clinician helps.
  • Later updates. PEACE & LOVE (2020) builds on POLICE, adds education and avoiding anti-inflammatory medicines in the early phase, and highlights optimism and pain-free aerobic exercise.

Getting the loading right

  • Use pain as your guide: mild discomfort (about 3 out of 10 or less) that settles within a day is generally acceptable
  • If pain climbs, the area swells more, or you start to limp, ease back to the previous step
  • Progress in small steps: protected movement, then weight-bearing, then resistance, then sport
  • Stay consistent. Short, frequent sessions usually work better than one long one

For the active person and athlete

  • Pull out of play, but keep training the rest of your body
  • Keep your fitness up with pain-free cycling, swimming or upper-body work
  • Load early and often, but build in recovery and sleep
  • Return to sport by criteria, not by date. See the return-to-play guide for the stages.

Optimal loading: early exercises

A simple progression. Move to the next step only when the previous one is comfortable. Stop if pain sharpens.

1. Protect and unload

For the first day or two, use support such as a brace, tape, sling or crutches so the injury is not stressed, while you keep the rest of the body moving.

Check You can move the joint gently without sharp pain

2. Light muscle holds (isometrics)

Tighten the muscles around the injury without moving the joint, using about a third to half of your effort.

Hold 10–30 seconds

Reps 5

Frequency Several times a day

3. Gentle range of movement

Move the joint slowly through its comfortable range, for example drawing the alphabet with your foot for an ankle.

Reps 10–15

Frequency Every hour or two while awake

4. Weight-bearing as tolerated

Start putting weight through the limb. Begin with short, level walks, then increase distance and speed as comfort allows.

Time 5–10 minutes

Progression Add time, then gentle slopes and stairs.

5. Progressive resistance

Add controlled strength work for the injured area with body weight, a band or light weights, building load slowly.

Reps 8–12

Sets 2–3

Progression Increase resistance when the last rep stays controlled.

6. Balance and control

Stand on the injured limb with a soft knee, then add small challenges such as closing your eyes or standing on a cushion.

Time 30 seconds

Sets 3

Progression Add head turns, a ball catch or small hops once cleared.

Red flags: get checked promptly

  • You cannot put weight on the limb or take four steps
  • Pain pressed directly over a bone, or a visibly crooked or deformed joint
  • Numbness, pins and needles, a cold or pale limb, or a rapidly growing swelling
  • Warmth, spreading redness or a fever
  • Any head, neck or back injury, dizziness, confusion or loss of consciousness
  • Calf pain and swelling without an injury, or chest pain or shortness of breath. Seek emergency care.
  • No clear improvement after three to five days, or the same injury keeps returning

References

This guide draws on the published sources below. They are listed for further reading and do not replace an assessment.

  1. Bleakley CM, Glasgow P, MacAuley DC. PRICE needs updating, should we call the POLICE? Br J Sports Med. 2012;46(4):220–221. Source
  2. Dubois B, Esculier JF. Soft-tissue injuries simply need PEACE and LOVE. Br J Sports Med. 2020;54(2):72–73. Source
  3. Bleakley CM, O’Connor SR, Tully MA, et al. Effect of accelerated rehabilitation on function after ankle sprain: randomised controlled trial. BMJ. 2010;340:c1964. Source
  4. Collins NC. Is ice right? Does cryotherapy improve outcome for acute soft tissue injury? Emerg Med J. 2008;25(2):65–68. Source
  5. Kwiecien SY, McHugh MP. The cold truth: the role of cryotherapy in the treatment of injury and recovery from exercise. Eur J Appl Physiol. 2021;121(8):2125–2142. Source

Related

General educational information from the practice — not personalised advice or a prescription. If anything is painful, stop. Book an appointment for guidance specific to you.